Transferring Samples from a 96-Well Plate to a Leo System Sample Plate using a Multi-Channel Pipette
The Voyager adjusts tip spacing with just a swipe of the thumb, making it easy to switch between plate formats.
| Pipette | Vendor | Volume Range | Part Number |
| 8 Channel VOYAGER | Integra | 2–50 µL | 4726 |
| 12 Channel VOYAGER | Integra | 2–50 µL | 4736 |
TABLE 1. Recommended pipette models for sample transfer to a Leo sample plate. The 8- or12-channel VOYAGER 2–50 µL model offers flexibility for both small-volume sample transfer and higher-volume antibody clone screening with replicates. The Integra VOYAGER is also commonly integrated into automated liquid-handling systems. This protocol can be executed manually or integrated into lab automation workflows that use VOYAGER-equipped robots.
Note: Using four tips at a time with an 8- or 12-channel pipette provides the best alignment for column-based transfer of samples. Each pass of the pipette moves four wells of the column in a 96-well plate directly to the corresponding column of the Leo sample plate, preserving the order and minimizing the risk of sample scrambling. Loading just four tips to your multi-channel pipette matches the vertical row layout of the Leo sample plate. Using rows for transfer would require additional steps, such as plate flipping or manual remapping, which increases the chance of errors and is therefore not recommended.
Protocol
1. Turn on the Integra VOYAGER pipette and select the appropriate volume range.
2. From the main menu, select “Tip Spacing” and set spacing as follows (Figure 1):
a. 9 mm to align with aspiration from the 96-well plate.
b. Adjust to 7 mm for dispensing into the Leo sample plate.
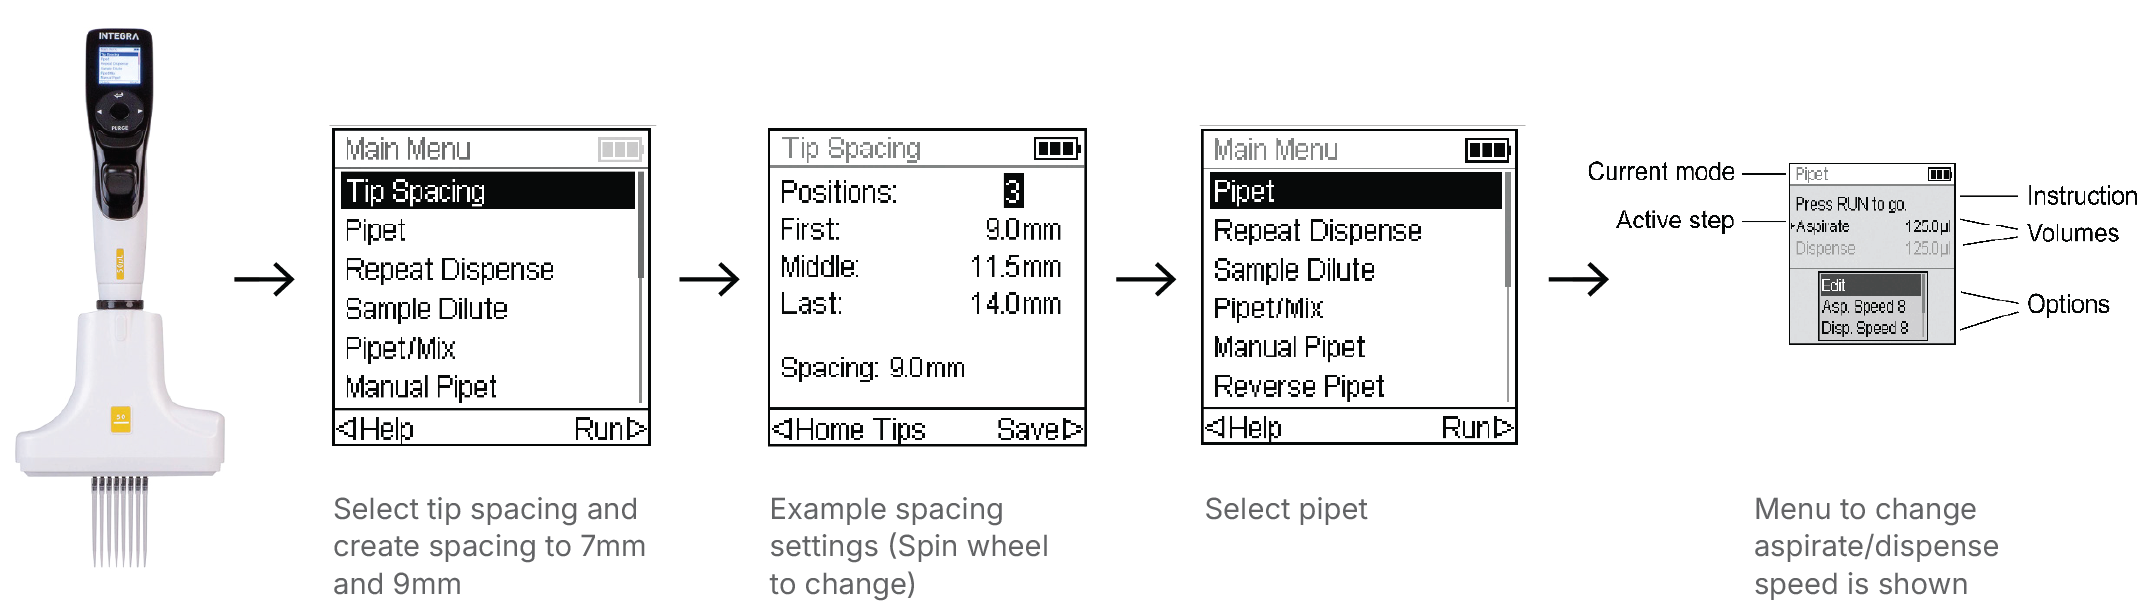
FIGURE 1. Configuring the Integra VOYAGER pipette. Starting from the main menu, tip spacing is adjusted electronically to match 96-well (9.0 mm) and Leo sample plate (7.0 mm) formats. After spacing is saved, the pipette mode and dispensing parameters (aspiration/dispense volume and speed) are set before beginning transfer. For more details, refer to the VOYAGER user manual.
3. Fit the Voyager pipette with compatible tips.
4. Position the pipette over the first column of the 96-well plate and aspirate the desired sample volume.
5. Swipe to adjust spacing and dispense directly into the corresponding column of the Leo sample plate.
6. Eject tips, change to a new set of four tips.
7. Repeat the process column by column until all samples are transferred (Figure 2).
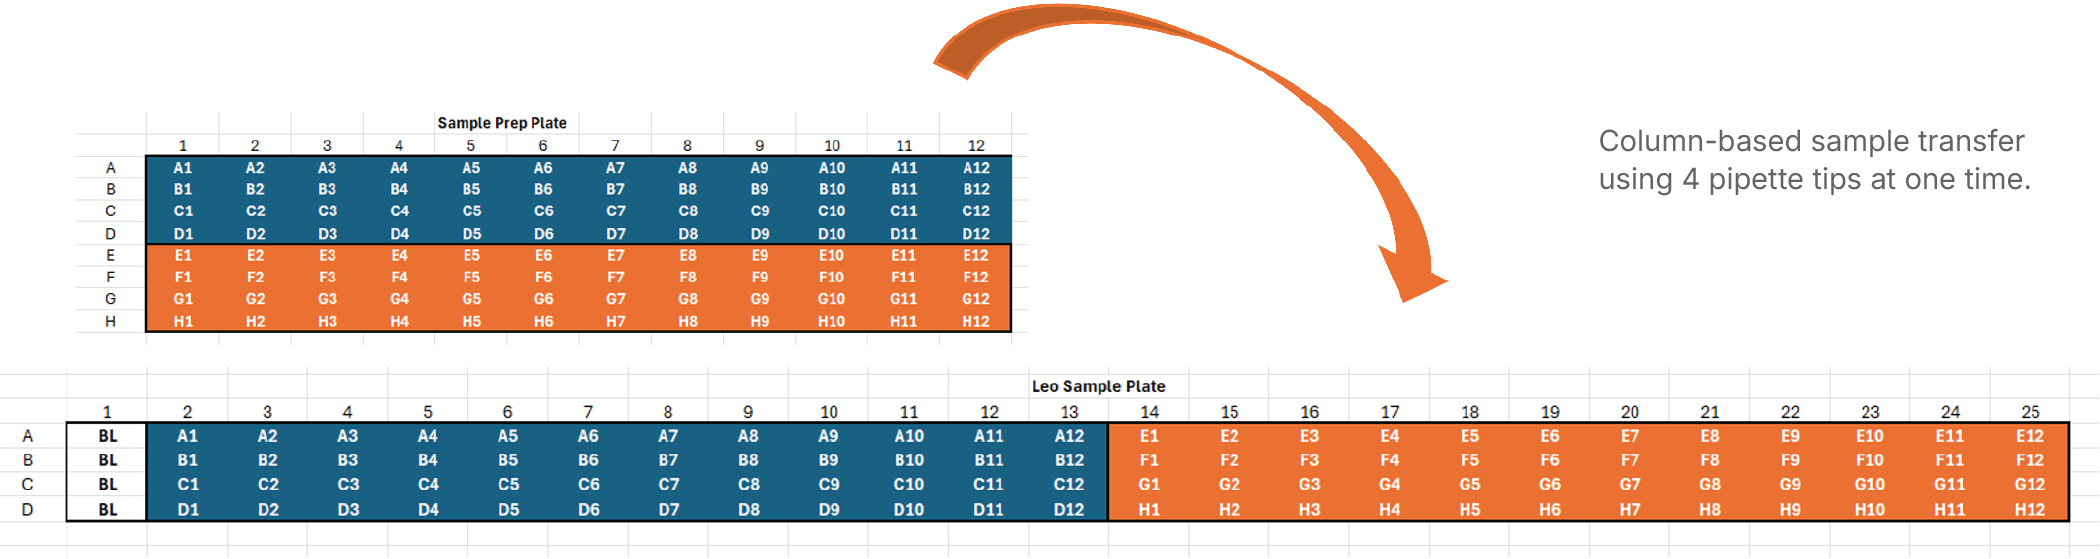
FIGURE 2. Preparing the 96-well plate for transfer. Samples are arranged in a standard 96-well format, with columns serving as the unit of transfer. Each column contains eight wells, but only four can be transferred at one time to align directly with the corresponding column of the Leo sample plate.
8. Place the cover on the Leo sample plate.
9. Centrifuge the plate for 5 minutes at 1000 x g at room temperature to collect samples at the bottom. Refer to the Leo Quick Reference Guide for more details on how to run the system.
10. Proceed with running the Leo system according to the system manual.
This workflow ensures that samples are transferred efficiently from a 96-well plate to a Leo sample plate through a column-based order. Using the 8- or 12-channel Integra VOYAGER pipette streamlines the process with electronic spacing adjustment, reducing the number of pipetting steps and providing a consistent and efficient setup for downstream analysis on the Leo system.
Note: For fixed-concentration reagents (e.g., antibodies), the VOYAGER pipette can aspirate directly from a deep-well plate or reagent boat. Set the tip spacing to 7.0 mm, then aspirate and dispense into the Leo plate. This method is ideal when dispensing the same reagent volume across multiple wells.